Market Trends Shaping Executive Summary Kinase Inhibitors Market Size and Share
CAGR Value
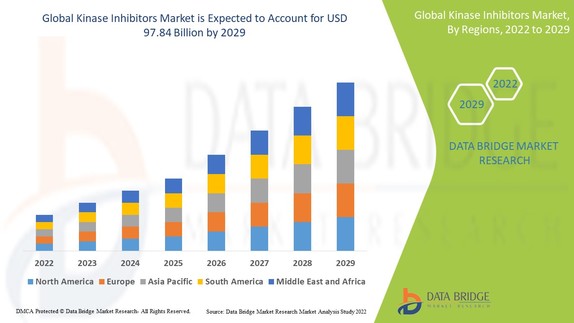
Data Bridge Market Research analyses a growth rate in the global kinase inhibitors market in the forecast period 2022-2029. The expected CAGR of global kinase inhibitors market is tend to be around 7.2% in the mentioned forecast period. The market was valued at USD 56.1 billion in 2021, and it would grow upto USD 97.84 billion by 2029.
An influential Kinase Inhibitors Market report contains key data about the market, emerging trends, product usage, motivating factors for customers and competitors. Moreover, market restraints, brand positioning, and customer behaviour, is also studied with which achieving a success in the competitive marketplace is simplified. With all this information, businesses can successfully make decisions about business strategies to achieve maximum return on investment (ROI). This industry report studies and evaluates facts and figures about the market segmentation very watchfully and represents it in the form of graphs for the better understanding of end user. Kinase Inhibitors Market report comprises of all the crucial parameters mentioned above hence it can be used for the business.
Research and analysis about the key developments in the market, major competitors and detailed competitor analysis included in the large scale Kinase Inhibitors Market report helps businesses envisage the bigger picture of the market place and products which ultimately assists superior business strategies. The market studies, insights and analysis conducted in this market research report keeps marketplace clearly into the focus which helps achieve business goals. Details about the market drivers and market restraints covered in Kinase Inhibitors Market business report helps understand whether the demand of the products will rise or get lower.
Unlock detailed insights into the growth path of the Kinase Inhibitors Market. Download full report here:
https://www.databridgemarketresearch.com/reports/global-kinase-inhibitors-market
Kinase Inhibitors Industry Performance Overview
Segments
- By Product Type: Small Molecules, Large Molecules
- By Application: Oncology, Immunology, Neurology, Autoimmune Diseases, Others
- By End User: Hospitals, Specialty Clinics, Ambulatory Surgical Centers, Research Institutes, Others
In the global Kinase Inhibitors Market, the segmentation is a crucial aspect that helps in understanding the various categories of products and their applications. The market is segmented based on product type, application, and end-user. In terms of product type, the market is categorized into two main segments, Small Molecules, and Large Molecules. Small molecules are widely used due to their high specificity and efficacy in treating various diseases. On the other hand, large molecules are gaining traction in the market owing to their ability to target specific pathways effectively.
The Kinase Inhibitors Market is further segmented by application, including Oncology, Immunology, Neurology, Autoimmune Diseases, and Others. Among these, the oncology segment dominates the market due to the rising prevalence of cancer worldwide. Kinase inhibitors have shown promising results in treating various types of cancers, creating a significant demand in the market. Additionally, the immunology and neurology segments are also witnessing substantial growth with the increasing focus on personalized medicine.
Moreover, the market is segmented based on end-user, including hospitals, specialty clinics, ambulatory surgical centers, research institutes, and others. Hospitals represent a significant share in the market due to the high patient influx and the availability of advanced healthcare facilities. Specialty clinics are also emerging as key end-users of kinase inhibitors, offering specialized treatment options to patients. Research institutes play a vital role in driving innovation and the development of novel kinase inhibitors, thus contributing to the market growth.
Market Players
- Novartis AG
- Pfizer Inc.
- Bayer AG
- F. Hoffmann-La Roche Ltd
- GlaxoSmithKline plc
- Bristol-Myers Squibb Company
- AstraZeneca
- Boehringer Ingelheim International GmbH
- Merck & Co., Inc.
- Johnson & Johnson Services, Inc.
The global Kinase Inhibitors Market is characterized by the presence of several key players who are actively involved in research and development activities to introduce innovative therapies. Companies such as Novartis AG, Pfizer Inc., and Bayer AG are among the leading market players, holding a significant market share. These companies are focusing on strategic partnerships, acquisitions, and product launches to strengthen their market position and expand their product portfolio. Additionally, collaborations with research institutes and academic centers are also common among key players to accelerate drug development and commercialization.
The global Kinase Inhibitors Market is anticipated to witness significant growth in the coming years due to the increasing prevalence of chronic diseases such as cancer, autoimmune disorders, and neurological conditions. The market players mentioned earlier, including Novartis AG, Pfizer Inc., and Bayer AG, are actively engaged in introducing novel kinase inhibitors to address the unmet medical needs of patients. These key players are investing heavily in research and development activities to bring forth innovative treatment options that target specific pathways involved in disease progression.
One of the key trends shaping the Kinase Inhibitors Market is the growing focus on precision medicine. With advancements in technology and increased understanding of disease mechanisms at the molecular level, there is a shift towards personalized treatment approaches. Kinase inhibitors play a vital role in precision medicine by targeting specific signaling pathways in individual patients, leading to better outcomes and reduced side effects. This trend is expected to drive the demand for kinase inhibitors across various applications, including oncology, immunology, and neurology.
Another factor driving market growth is the increasing investment in healthcare infrastructure and the expansion of healthcare facilities globally. The rising healthcare expenditure, coupled with favorable government initiatives to improve access to advanced therapies, is expected to propel the demand for kinase inhibitors in hospitals, specialty clinics, and ambulatory surgical centers. Moreover, the presence of key market players in regions such as North America, Europe, and Asia-Pacific is likely to boost market growth through strategic partnerships and collaborations with local healthcare providers.
Furthermore, the COVID-19 pandemic has highlighted the importance of effective treatment options for infectious diseases and the need for rapid drug development. Kinase inhibitors have shown potential in repurposing for antiviral therapies, opening up new avenues for market expansion. Companies are exploring the use of kinase inhibitors in combination therapies to combat infectious diseases and are conducting clinical trials to assess their efficacy in treating COVID-19 and other viral infections.
In conclusion, the global Kinase Inhibitors Market is poised for substantial growth driven by innovative product developments, increasing prevalence of chronic diseases, and the shift towards personalized medicine. Key market players are likely to focus on expanding their geographical presence, strengthening their research capabilities, and forging strategic collaborations to capitalize on emerging opportunities in the market. The future outlook for the Kinase Inhibitors Market remains optimistic, with continued advancements in drug discovery and a growing emphasis on patient-centric healthcare solutions.The global Kinase Inhibitors Market is poised for significant expansion due to a multitude of factors driving growth. Market players such as Novartis AG, Pfizer Inc., and Bayer AG have been pivotal in introducing innovative therapies to meet the escalating demand for kinase inhibitors. These players are heavily invested in R&D efforts to develop new treatment options that target specific disease pathways effectively. Collaborations with research institutions and academic centers further accelerate drug discovery and development processes, fostering market advancement.
An emerging trend shaping the Kinase Inhibitors Market is the shift towards precision medicine. There is a growing emphasis on personalized treatment strategies that target individual patients' molecular profiles for enhanced therapeutic outcomes. Kinase inhibitors play a crucial role in this approach by targeting specific signaling pathways, leading to improved efficacy and reduced adverse effects. This trend is expected to drive demand across various applications, particularly in areas like oncology, immunology, and neurology.
Additionally, the global healthcare landscape is witnessing increased investments in infrastructure and facility expansions. Rising healthcare spending, coupled with supportive governmental initiatives to enhance access to advanced treatments, is anticipated to fuel the demand for kinase inhibitors across different healthcare settings such as hospitals, specialty clinics, and ambulatory surgical centers. The presence of key market players in strategic regions like North America, Europe, and Asia-Pacific is set to further stimulate market growth through collaborations with local healthcare providers.
Moreover, the ongoing COVID-19 pandemic has underscored the urgency for effective treatment options for infectious diseases. Kinase inhibitors have exhibited promise in being repurposed for antiviral therapies, creating new opportunities for market expansion. Companies are exploring the potential of kinase inhibitors in combination therapies to combat various infectious diseases, including COVID-19, through ongoing clinical trials to evaluate their efficacy.
In conclusion, the global Kinase Inhibitors Market is on a trajectory of substantial growth driven by advancements in product development, the prevalence of chronic diseases, and the shift towards personalized medicine. Market leaders are expected to focus on strengthening their research capabilities, expanding market reach, and forming strategic alliances to capitalize on emerging market prospects. The future of the Kinase Inhibitors Market looks promising, with a continued focus on innovation in drug discovery and a commitment to patient-centered healthcare solutions.
Check out detailed stats on company market coverage
https://www.databridgemarketresearch.com/reports/global-kinase-inhibitors-market/companies
In-Depth Market Research Questions for Kinase Inhibitors Market Studies
What’s the market's carbon emission status?
What is the CAGR by segment type?
How are digital twins used in this Kinase Inhibitors Market industry?
Which consumer pain points are unmet?
How do brands manage product recalls?
What return on innovation is seen by top players in Kinase Inhibitors Market?
What innovations are improving durability?
How is multilingual marketing impacting reach for Kinase Inhibitors Market?
What incentives are offered in B2B contracts?
How do geopolitical crises impact exports for Kinase Inhibitors Market?
What is the lifecycle cost of a product?
What are the unmet needs of rural consumers?
How do brands handle fake or counterfeit products?
Which regions have the most favorable logistics?
Browse More Reports:
Asia-Pacific Printable Self-Adhesive Vinyl Films Market
Middle East and Africa Printable Self-Adhesive Vinyl Films Market
North America Printable Self-Adhesive Vinyl Films Market
Asia-Pacific Prostate Cancer Diagnostics Market
Middle East and Africa Prostate Cancer Diagnostics Market
North America Prostate Cancer Diagnostics Market
Asia-Pacific Rheology Modifiers Market
North America Rheology Modifiers Market
Europe Rheology Modifiers Market
Middle East and Africa Rheology Modifiers Market
Asia-Pacific Robot Assisted Percutaneous Coronary Intervention (PCI) Market
Europe Robot Assisted Percutaneous Coronary Intervention (PCI) Market
Middle East and Africa Robot Assisted Percutaneous Coronary Intervention (PCI) Market
North America Robot Assisted Percutaneous Coronary Intervention (PCI) Market
Central America Safety Footwear Market
Europe Silk Market
Asia Pacific Silk Market
Global Quantitative Absorptiometer Market
About Data Bridge Market Research:
An absolute way to forecast what the future holds is to comprehend the trend today!
Data Bridge Market Research set forth itself as an unconventional and neoteric market research and consulting firm with an unparalleled level of resilience and integrated approaches. We are determined to unearth the best market opportunities and foster efficient information for your business to thrive in the market. Data Bridge endeavors to provide appropriate solutions to the complex business challenges and initiates an effortless decision-making process. Data Bridge is an aftermath of sheer wisdom and experience which was formulated and framed in the year 2015 in Pune.
Contact Us:
Data Bridge Market Research
US: +1 614 591 3140
UK: +44 845 154 9652
APAC : +653 1251 975
Email:- corporatesales@databridgemarketresearch.com